How to Add Print Friendly and PDF Button in Blogger
Do you want to Add Print Friendly Button in Blogger?
If really want to Add Print Friendly and PDF Button in Blogger to make your site more user friendly then you have come to the right place, because below you will find complete solution with proper guidance...
Print Friendly Button Option is a best way to boost user experience of your website, because most users confuse about extra Ads and Images which creates a problem while reading quality articles. Sometimes readers have not much time to online read your entire article, therefore they like to print that post so that they can ready it later. But if your blog wouldn't be print friendly then your site users cannot print desire article. So every webmaster should install this feature on his/her website to increase user experience in her/his site.
Adding Print Friendly and Pdf Button in Blogger
There are many plugins are available for WordPress users having printing features, but unfortunately there is no plugin available for blogspot users which could give to your site a best user experience, but don't be worried i have a solution for it. Thus you have to follow below all instructions guide, it is more easy than you think because i have described the whole procedure with step by step screenshots. So that you may not face any trouble while reading and applying it on your website. There are two simple parts which you have to follow, okay now let start...
Part 1# How to Get Print Friendly Button for your blog
1. First visit PrintFriendly
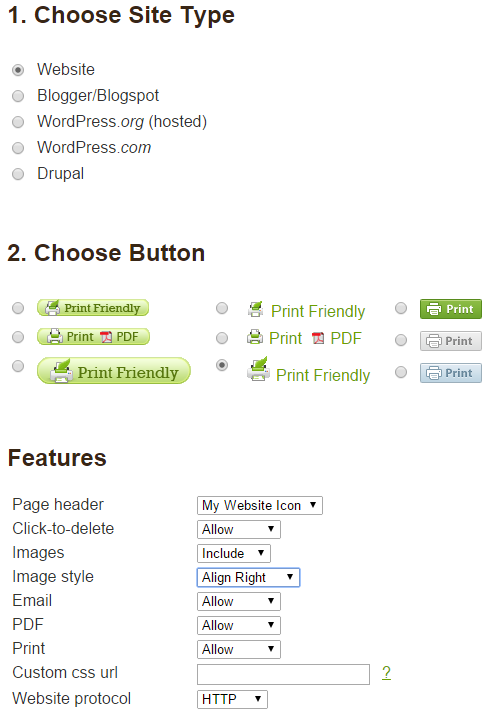
2. Now choose your desire options according to your need, for example i have selected options like below screenshot

Choose Button: Here you can see several printing button styles, so select on of your favorite according to your wish
Features: Here you will find many options, but for better understanding i have described them below!
Page header: Its mean if you want to add custom printing logo then you can choose "Upload an Image" to upload your own logo rather than "My Website Icon". (Not Recommended)
Click-to-delete: Allows users to delete desire line, paragraph or code within prepare for printing
Images: By enabling it users can see images of the article
Image style: This option helps to webmasters to align printing button right, left, center etc.
Email: Users can easily email your post to others
PDF: It helps to open an article in any pdf reader
Print: By using it, users can print any article, do not disable this feature
Website protocol: If you do not use SSL in your site then leave it as default
After setting up the options just scroll down and you will see a code like below just that code.
If you haven't understand the above instructions then simply copy the below code.
<script>var pfHeaderImgUrl = '';var pfHeaderTagline = '';var pfdisableClickToDel = 0;var pfHideImages = 0;var pfImageDisplayStyle = 'right';var pfDisablePDF = 0;var pfDisableEmail = 0;var pfDisablePrint = 0;var pfCustomCSS = '';var pfBtVersion='1';(function(){var js, pf;pf = document.createElement('script');pf.type = 'text/javascript';if('https:' == document.location.protocol){js='https://pf-cdn.printfriendly.com/ssl/main.js'}else{js='http://cdn.printfriendly.com/printfriendly.js'}pf.src=js;document.getElementsByTagName('head')[0].appendChild(pf)})();</script><a href="http://www.printfriendly.com" style="color:#6D9F00;text-decoration:none;" class="printfriendly" onclick="window.print();return false;" title="Printer Friendly and PDF"><img style="border:none;-webkit-box-shadow:none;box-shadow:none;margin:0 6px" src="http://cdn.printfriendly.com/pf-icon.gif" width="23" height="25" alt="Print Friendly and PDF" />Print Friendly</a>
Part 2# How to Insert JavaScript Code into Blogspot
1. Log into Blogger Dashboard >> Template >> Edit HTML
2. Now search for this <data:post.body/> and paste the above JavaScript code that you have recently copied just above <data:post.body/> to show button below post title and for showing it below every post then simply paste the code just below <data:post.body/>
3. Click on "Save Template" button to save your settings.
Note: Based upon your template, there are surely chances that you will find multiple instances of <data:post.body/>. So try with all of them.
If you have any conclusion/query in your mind about the tutorial then feel free to contact with me just by entering your questions in below comment section.


Comments
Post a Comment